The bottom level of the pelvis is the pelvic outlet; this is the final level of the pelvis that baby descends and rotates through during birth. The outlet’s shape is determined by the balance of the pelvic joints, ligaments, and movements. The outlet space can be increased side to side with the internal rotation of the femur causing the ischial tuberosities (sitz bones) to move farther apart.
The outlet space can be increased front to back based on the movement of the sacrum and coccyx (tailbone). The opening of the pelvic outlet is tied to the outward movement of the sacrum. This is why pushing on your back may not be the most beneficial, as the sacrum has nowhere to move out towards, and the opening of the pelvic outlet would be restricted and limited.
The opening of the pelvic outlet from front to back is influenced by the sacrotuberous ligament and sacrospinous ligament. Each ligament sort of blends with the other but attach from the pelvis to the sacrum/coccyx. During labor, the sacrum needs to move outwards in order to increase the opening of the pelvic outlet. If these ligaments are “tight,” then the sacrum may not be able to move or may be limited.
If you sit on a tennis ball, you may be able to find these ligaments and massage them out. You can feel for the ligaments by placing your finger in the space between your tailbone and sitz bones, and then cough. You should feel the ligament tighten. Place the ball there, and then sit down on it and gently massage it out. In points of tension or discomfort, focus a little more there to help release the tension.
Now, how would we open the pelvis from side to side? Think Knees In, Ankles Out!
Internal rotation of the femur opens the ischium, the bottom of the pelvic opening (the outlet aka where your baby is trying to vacate the premise from). The posterior portion of the ischium is the Ischial tuberosity, or your sitz bones; you actually feel these when you sit down!
How can you accomplish an internal rotation of the femur while in labor? Primarily by having the knees closer together than the ankles; this will generally achieve internal rotation of the femur. Remember, this doesn’t mean that the knees need to touch or even be close to one another. We just want the knees to be closer than the ankles!
*The Pelvic Outlet*
Let’s compare internal rotation versus the typical external rotation (or spreading of the legs) that we are typically coached to do during labor.
In this video, I placed white dots on my sit bones (it took a few attempts). When I internally rotate my femurs by keeping my knees together and spreading my ankles apart, you can see that the white dots spread apart from one another. While this opening isn’t massive, it’s still opening! It is an extra bit more space to support the baby’s rotation & descent out of the pelvis and into the world!!
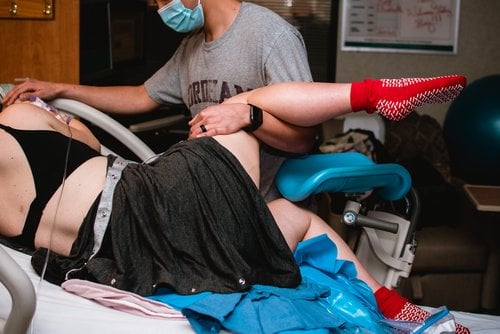
If the birthing person has an epidural or needs to rest between pushes, and baby is +2 station or below, using a peanut ball is a great option to continue to incorporate internal rotation of the femur.
Focus on placing the peanut ball between the ankles as opposed to the knees to allow for the internal rotation of the femur to occur. You can place a pillow between the knees for additional support if the knees touching is too intense of an internal rotation.
You can also lower the bottom portion of the bed to allow the bottom leg to sit in an internal rotation. Place the ankle on the lower portion, and the knee on the middle portion of the bed.
*The Pelvic Outlet*
Considerations with Internal Rotation
When we are trying to emphasize internal rotation with the femur, we want to remember that the internal rotation is at the HIP and not the knee.
Think of the entire leg as a single unit where the thigh and lower leg move together, as opposed to only trying to move the lower leg. Only moving the lower leg can really strain the knee ligaments!
Here is a helpful way to support the leg in side-lying that focuses the internal rotation at the HIP as opposed to the knee. Place the lower leg into the crease of the elbow, so the lower leg rests on the forearm. Then wrap the arm under to place the hand on the top of the thigh. When you lift your elbow, think push down on the hand, and this will help the entire leg move as a single unit!