

Have you been told your pelvic floor is too tight—and now you’re on the hunt for the pelvic floor stretches that will finally fix it? Maybe you’ve already tried all the deep squats, butterfly poses, and wide-legged stretches… but you’re still dealing with the same discomfort, tension, or symptoms.
I’ve been there, too. During one of my pregnancies, I was desperate to relieve my SI joint pain. I kept trying pigeon pose and every external rotation stretch I could think of, convinced I just needed to loosen up my glutes. But nothing helped. I was frustrated and uncomfortable—and I know so many of you are in that same boat.
We get DMs and emails all the time from clients asking for the best stretch for their SI joint pain, pelvic floor tension, leaking, or prolapse. They’ve been told their pelvic floor is too tight… but the typical stretches just aren’t cutting it.
In this blog, I’m sharing six pelvic floor stretches that actually target the right areas and bring real relief—whether you’re dealing with pain, pressure, or pelvic floor symptoms that just won’t quit. Let’s get into it.
What Are the Best Pelvic Floor Stretches?
Before we dive into the best stretches, it’s important to understand how the pelvic floor is connected to the rest of your body—because it’s not just about doing random stretches and hoping for the best.
The pelvic floor attaches directly to your pelvis—specifically to the front, sides, and back (near the sacrum). So the position of your pelvis, your hips, and even your ribcage can all change how much tension is in different parts of your pelvic floor. And if you’re dealing with tightness, it’s probably not everywhere—it’s often concentrated in the back of the pelvis, near the sacrum where all the pelvic floor muscles come together.
Many of us (especially during pregnancy) tend to shift into a more extended spine—hello, arched low back! This posture compresses the sacrum and puts extra tension on the back part of the pelvic floor. That might be the area that’s actually tight and overactive.
So if you’ve been doing all the deep squats, wide-legged child’s pose, and butterfly stretches to try and stretch your pelvic floor… but still feel tight? You might be targeting the wrong area.
Most of those “classic” stretches are great for the front of the pelvic floor—but that part is often already pretty lengthened in those wide-knee positions. What you really need might be a stretch that targets the back of the pelvic floor instead.
Top Stretches to Relax a Tight or Overactive Pelvic Floor
There’s no one magic stretch that will release your entire pelvic floor—because the pelvic floor isn’t just one muscle. It’s a group of muscles that span the bottom of your pelvis, and different positions target different areas.
Instead of focusing on a single stretch, let’s explore eight different movements that can help release the front, sides, and back of your pelvic floor.
To stretch the front of the pelvic floor: Try wider-leg positions like deep squats or a supported malasana pose. (Keep in mind—many of us already have plenty of length here, so this may not be the area that needs the most attention.)
To target the pelvic floor diagonally: Asymmetrical positions like half-kneeling lunges, hip shifts, and 90/90 seated poses can help lengthen the diagonal fibers of the pelvic floor.
To release the back of the pelvic floor: Focus on breathwork that expands the back of the rib cage, combined with hip shifts. These movements help decompress the sacrum, which is where most of us hold tension.
8 Pelvic Floor Stretches to Release Tension (and Finally Feel Relief!)
1. Deep Squat with a Twist – Stretch the Front of the Pelvic Floor and Add Thoracic Mobility
Let’s start with one of the most common pelvic floor stretches: the deep squat. In a wider-legged squat, you’re lengthening the front portion of the pelvic floor—which, for many of us, is already pretty stretched out.
To deepen the release and make this stretch more effective, try adding a thoracic twist.
Why? Because your rib cage and pelvic floor are teammates—and when the thoracic spine is stuck in one direction (which is super common), it can cause the pelvis to twist or torque in response. That torque can show up as tension and imbalance in your pelvic floor, especially if one side is being pulled tighter than the other.
How to do it:
- Get into a deep squat with your feet turned out and knees wide.
- Reach one arm up toward the ceiling, twisting through your spine and rib cage.
- Alternate sides, doing about 10–15 twists per direction.
- Struggling to get into a deep squat? No worries—place a rolled-up yoga mat under your heels to help with ankle mobility, or sit on a yoga block for support.

2. Back Expansion Breathing – Release the Back of the Pelvic Floor Through Breath
If your pelvic floor feels tight, your breath might be the missing link. Breathing impacts how your pelvic floor moves—and this next stretch focuses on using inhalation to create space in the back of the pelvis where most of us tend to hold tension.
When you inhale, your diaphragm moves down—and your pelvic floor should naturally lower and lengthen in response. When you exhale, your pelvic floor can recoil upward, either passively like a rubber band or through gentle activation.
This back expansion breathing exercise helps encourage movement and stretch in the back of the rib cage and pelvis—an area that’s often compressed when we live in an extended (arched) spine position.
How to do it:
- Sit or kneel in a rounded spine position (think child’s pose or seated on your heels).
- Hug a pillow in front of you to help exaggerate the curve in your spine.
- Inhale deeply, focusing on expanding the back of your rib cage—you should feel your lower back and sacrum area gently stretch.
- Exhale slowly, pulling your belly toward your spine and hugging the pillow tighter. This will deepen the rounding and may stretch your lower back even more.
- Continue for 10 deep breaths, or stay here for 1–2 minutes.
Most of us have more tightness toward the back of the pelvic floor, so this position is especially helpful for softening and releasing those deep, stubborn areas.

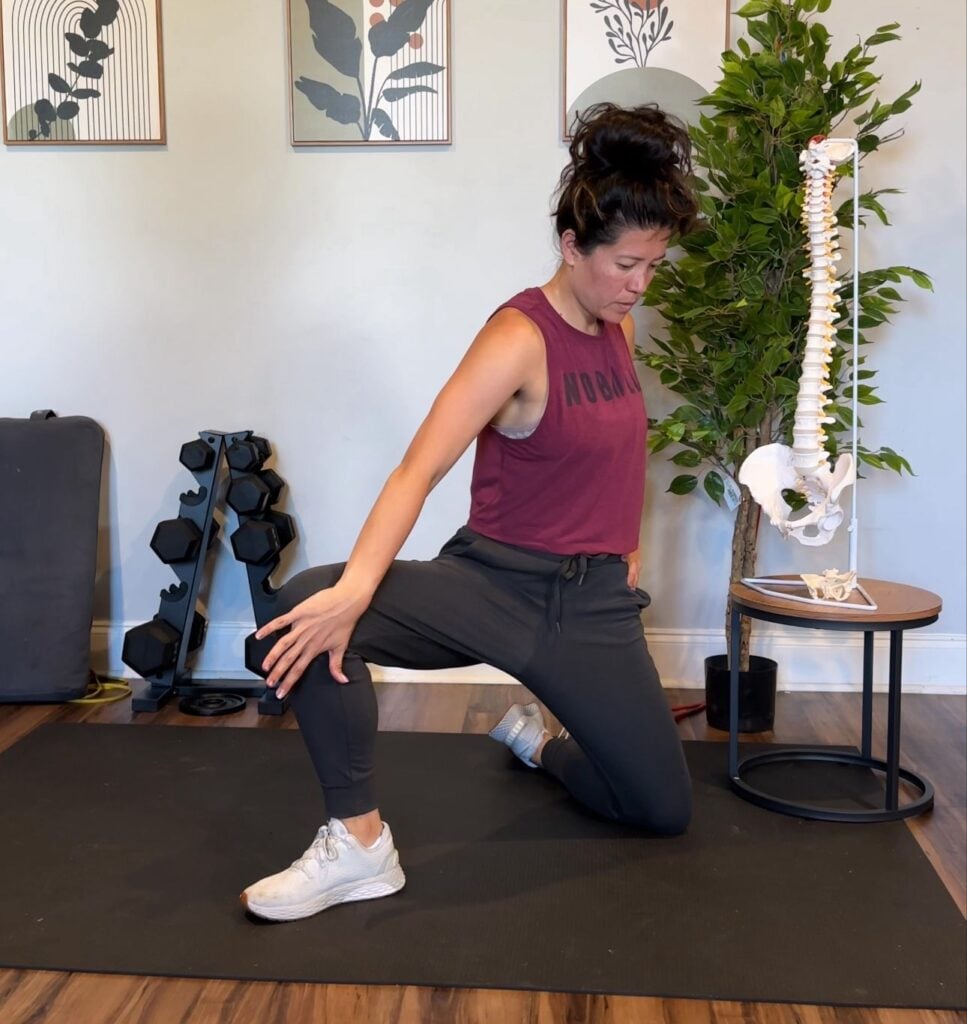
3. Half Lunge Hip Shift – Release the Overactive Front Right Side of the Pelvic Floor
Next up: an asymmetrical stretch that helps target a very common area of pelvic floor overactivity—the front right side.
Thanks to typical postural habits (hello, standing with all your weight on one hip!), many of us tend to load into our right leg more often. Over time, this can lead to the right front portion of the pelvic floor working overtime, becoming tight and overactive.
This stretch is designed to offload that right front pelvic floor, giving it space to finally relax and release.
How to do it:
- Start in a half lunge position with your right leg forward and your left leg back.
- Keep your front big toe grounded for stability and to help engage the inner thigh.
- Gently rock your weight forward into the front leg as you slightly rotate your hips toward the back leg (to the left).
- You should feel a stretch in the groin of the front leg—this rotation helps target the diagonal fibers of the pelvic floor.
- Move slowly, and try 10–15 gentle rocks, staying relaxed through your breath.
This one’s sneaky but effective—especially if you’re someone who carries a lot of tension in the front right side of your body.
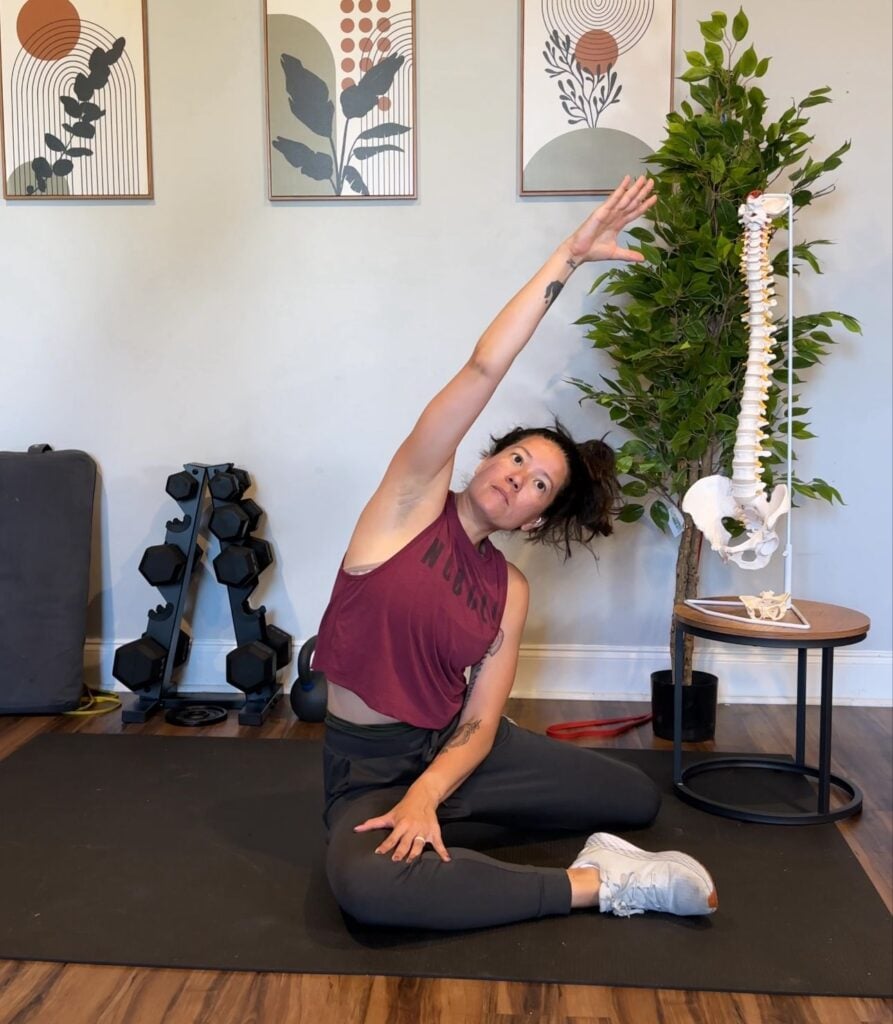
4. 90/90 with Side Body Reach – Diagonal Pelvic Floor & Side Rib Cage Stretch
Now let’s dive into hip rotation, which is another powerful way to create space in the pelvic floor—especially on a diagonal line.
The 90/90 position places the front leg in external rotation and the back leg in internal rotation. This combo creates a diagonal stretch across the pelvic floor, which helps release asymmetrical tension that builds up from day-to-day postural habits.
Want to take it up a notch? Add a side body opener by reaching overhead. Lateral thoracic mobility is often overlooked—we’re familiar with twists and cat/cows, but most of us aren’t moving side to side enough. And since the rib cage and pelvic floor work as a team, opening up the sides of the rib cage can improve how well your pelvic floor can move and relax.
How to do it:
- Sit in a 90/90 position with one leg in front (bent at 90°) and the other to the side or behind you (also bent at 90°).
- Press both knees into the floor to engage the hips and ground your base.
- Reach one arm overhead (toward the side of your back leg) and lean gently into a side body stretch.
- Focus on expanding your side ribs with every inhale.
- Hold for at least 10 deep breaths, then switch sides.
This stretch not only targets diagonal pelvic floor fibers but also helps restore rib cage movement—giving your whole core system more balance and freedom to move.
5. 90/90 Side Camel – Dynamic Pelvic Floor Stretch + Thoracic Mobility
Let’s take the 90/90 stretch and make it dynamic by adding in a camel-inspired hip extension. This variation not only works your pelvic floor but also helps open up the hip flexors—especially the front of the pelvis—which can improve overall pelvic mobility and help you access a more tucked, neutral pelvic position.
How to do it:
- Start in the 90/90 position, just like in the previous stretch.
- Reach the arm (on the same side as your front leg) up and overhead for a side body opener.
- Then place that hand behind you on the floor and press your hips up toward the ceiling.
- Focus on extending the hips and tucking your tailbone under slightly at the top—this will intensify the stretch in the hip flexor of the back leg.
- Lower back down with control and repeat 10–15 times per side.
As you flow through this stretch, notice how each side feels.
- Is one side easier to sit into the 90/90?
- Does one hip flexor feel tighter?
- Is your balance or reach different on each side?
There’s no need to fix anything right away—just bring awareness to the differences. The pelvic floor rarely feels the same on both sides, and exploring those sensations is a powerful part of restoring balance.
6. All Fours Hip Shift with Adductor Release – Improve Pelvic Rotation and Deep Muscle Balance
Now let’s shift (literally!) into pelvic rotation, which is different from hip rotation—and super important for releasing deeper layers of pelvic floor tension.
Here’s the difference:
- Hip rotation = the leg moves on the pelvis. Think about 90/90, wide vs. closed knees, or even butterfly pose—where the thigh and ankle change positions relative to the pelvis.
- Pelvic rotation = the pelvis moves on a fixed leg. The leg stays still, and the pelvis rotates over it. This creates a deep stretch in the groin, inner thigh, or glute—depending on the angle.
This subtle shift in mechanics helps you stretch parts of the pelvic floor and surrounding muscles that you may have never reached before.
How to do it:
- Start in an all fours/tabletop position, with your knees wide enough to feel grounded.
- Shift your weight toward one side, pressing both knees into the floor as you go.
- As you shift, you’ll likely feel a deep glute stretch on the side you’re leaning into, and a groin or adductor stretch on the opposite side.
- Be mindful to keep both knees pressing down—this activates the right muscles and improves stability.
- You can either move in and out of the shift 8–10 times per side, or hold for 1–2 minutes per side.
This movement mimics how our pelvis rotates while walking and moving through daily life—so restoring mobility here can help your pelvic floor function more naturally and with less tension.

7. All Fours Hip Shift with Pelvic Tilts – Deepen Posterior Pelvic Floor Release + Add Thoracic Mobility
Let’s build on the previous hip shift by adding a pelvic tilt—and an elevated position—to target the posterior pelvic floor even more effectively.
As we’ve mentioned, the back of the pelvic floor (around the sacrum) tends to hold more tension than the front. Hip shifts help release that tightness—but adding in pelvic tilts while in a slightly elevated position takes the stretch deeper into that tight posterior pocket.
How to do it:
- Start in an all fours position, but elevate one knee on a yoga block or low cushion.
- Shift your weight into the elevated knee, keeping both hands planted for support.
- From here, move through gentle pelvic tilts—think arch and tuck your pelvis while keeping your spine relatively still.
- As you tuck, you may feel a release around your sacrum and glute.
- Repeat for 10–15 slow and controlled reps, then switch sides.
This variation also adds a subtle element of thoracic mobility, especially as you move through the tilts while stabilizing your upper body. It’s a powerful combo for improving pelvic alignment and releasing stubborn tension.
8. Lateral Hip Shifts – Foot & Ankle Mobility to Support Pelvic Floor Release
This final stretch (though we include so many more inside our prenatal and postpartum fitness programs!) brings it all together—targeting not just the hips and pelvic floor, but also the feet and ankles, which play a surprisingly big role in how your pelvic floor functions.
The lateral hip shift combines an inner thigh stretch, deep glute release, and foot activation—all essential for supporting pelvic floor mobility and balance.
How to do it:
- Start in a standing position with your feet just wider than hip-width apart.
- Shift your weight to one leg, bending into that knee and sending your hips back like a hinge.
- The opposite leg stays straight, and you should feel a stretch through the inner thigh of that straight leg.
- Keep both big toes grounded as you move—this helps activate your arch and align the pelvis from the ground up.
- Slowly shift side to side for 8–10 reps per side, focusing on control and even weight distribution.
This movement mimics natural walking mechanics, engages the feet and hips, and gives your pelvic floor the support system it needs—especially if you’re rehabbing from pelvic floor dysfunction, leaking, or prolapse symptoms.
Bonus: Full-Body Mobility Routine to Support Pelvic Floor Function
Now that you’ve explored how different hip positions, pelvic rotations, and thoracic movements affect the pelvic floor, let’s bring it all together into a simple, full-body mobility routine.
This flow includes all three key thoracic movements—rotation, flexion/extension, and lateral flexion—and targets the pelvis in multiple positions: wide (external rotation), closed (internal rotation), and asymmetrical/rotated. The goal? To support your pelvic floor from every angle.
Want more guided mobility and strength progressions that support your pelvic floor throughout pregnancy and postpartum? Check out our fitness programs here—each one is built with these movement principles in mind.