


There is a lot we can do during pregnancy to prepare for birth! One of the things we can focus on is finding what is the best position for your baby and ensuring that your baby’s path to rotate is CLEAR!
We get a lot of messages about “how do I fix my baby’s position so they are in this specific position (usually OA or LOA)?”
And our response is: “Are you pregnant or in labor right now?”
If the reply is “I’m pregnant but not in labor,” then our response is to focus more on ensuring our baby’s path to rotate is clear for when labor begins!
We can do ALL the things to try to FORCE baby into what we think is the *best* position, but there are a few things to consider when we do this!
The most important thing is that we do not know exactly what the best position is for our baby!
For some of us, baby being more on the right side is better; for others baby being on the left is better. The best position is the one that helps baby TUCK their chin, which can be different for each of us.
Then it also depends on WHERE baby is in the pelvis: is baby still in the inlet or is baby in the midpelvis? Baby’s position in each of those pelvic levels is different too!
So, you can hopefully see that trying to FORCE our baby into one position during pregnancy may NOT be helpful at all.
Plus, once you get them into that position, without strong contractions, your baby will just wiggle and move around. They could be on the left side one day, then rotate to roll to the right side the next minute.
A better way to focus your energy is to ensure that your baby’s path to rotate is clear! This means that there are no musculoskeletal obstacles in your baby’s path! Let’s explore this more.
When trying to support our baby getting into their BEST position for birth, we want to focus on:
- Releasing the uterine ligaments
- Releasing the posterior pelvic floor
- Ensuring each pelvic level can open and move freely
Each of those focuses can influence our baby’s position! Our baby’s position is NOT random, but rather the response to the space that is available for them.
If the uterine ligaments are taunt and pulling on the uterus, it can change the shape and space available for baby. If the lower uterine ligaments are torqued, it could make it harder for baby to rotate into a head down position or descend into the pelvis.
If the posterior pelvic floor is tight, or there is asymmetrical tension in the pelvic floor, it could influence how our baby’s head is positioned! The best position for your baby is the one where their chin is tucked!
So, if we have uneven tension on the pelvic floor, it can cause our baby’s to tilt their head sideways or even extend their neck. We incorporate a lot of pelvic floor release exercises in our pelvic floor prep for birth course and in our prenatal fitness programs.
And then we want to be able to open each pelvic level to create more space with the bony structure! We incorporate a lot of work to focus on pelvic movement in our prenatal fitness programs!
Release the Uterine Ligaments
There are several uterine ligaments that attach the uterus to the surrounding structures! These uterine ligaments include:
- The round ligaments (vertical)
- The broad ligament (horizontal)
- The uterosacral ligaments (vertical)
The uterine ligaments can influence the uterine shape! If there is an uneven pull in the uterine ligaments, it can influence how your baby can position itself inside the uterus.
The first thing we can do as we prepare for birth is to ensure that the uterine ligaments are balanced to support our baby’s position!
We can do this with movement and by seeing a professional like a Webster-certified chiropractor or working with a pelvic floor physical therapist.
1) Inversions
One of our favorite ways to release uterine ligaments, especially the vertical running ones, is with inversions!
An inversion is anything where the hips are higher than the head. It can vary in intensity depending on your comfort level too!
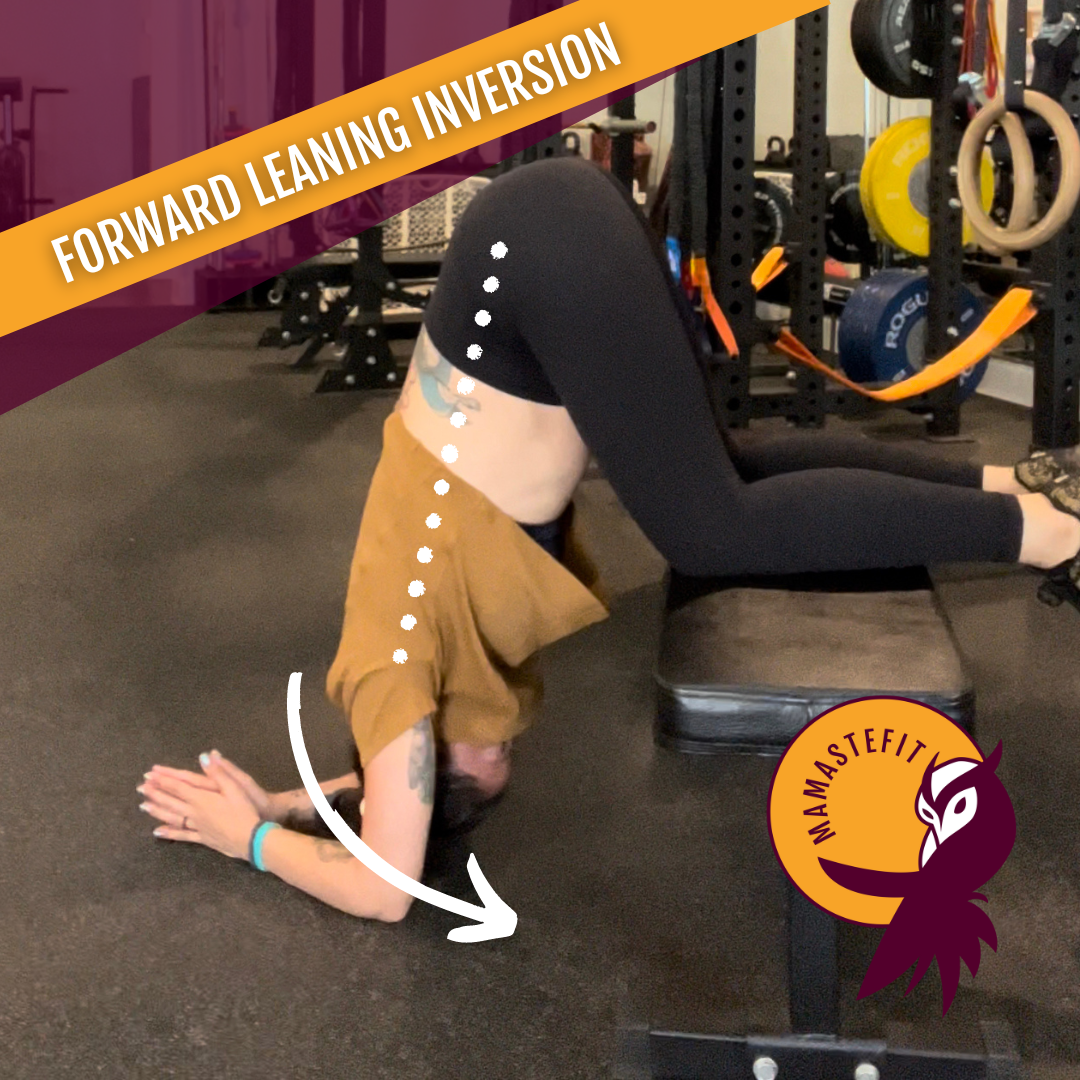
The forward-leaning inversion (pictured) is the most intense of the inversions that we would recommend and offers the deepest release.
In the forward-leaning inversion, start with the legs on an elevated surface such as your couch or a bench, then drop down to the forearms. Tuck the chin and hold for three full breaths. You should feel a release in the sacral area and the round ligaments.
If this is too intense, try a puppy dog pose or an open knee chest supported inversion. In both of these, the release is less intense but can be easier to hold for a longer period of time.


Release the Posterior Pelvic Floor
The pelvic floor plays a large role during pregnancy and birth (and life in general). During labor, the pelvic floor influences your baby’s head position.
If the pelvic floor has uneven tension in the pelvic floor, it can cause your baby’s head to tilt sideways (which makes them present larger) or even extend their head (the largest diameter).
For many of us, the posterior portion of the pelvic floor has more tension, particularly the left posterior quadrant. During pregnancy (and you can even do this during labor) we can focus on releasing the posterior pelvic floor with hip-shifted positions.
2) Standing Hip Shift
The standing hip shift forces the pelvis into internal rotation, abduction, and a posterior pelvic tilt. All three of these movements help to release and stretch the posterior quadrant of the pelvic floor (where most of us need a release)!
In the standing hip shift, we should be feeling more a stretch in the hamstring and glute of the target leg. I find that putting more weight into the big toe side of the foot and try to rotate the knee inward without moving the foot helps my clients move deeper into this movement!
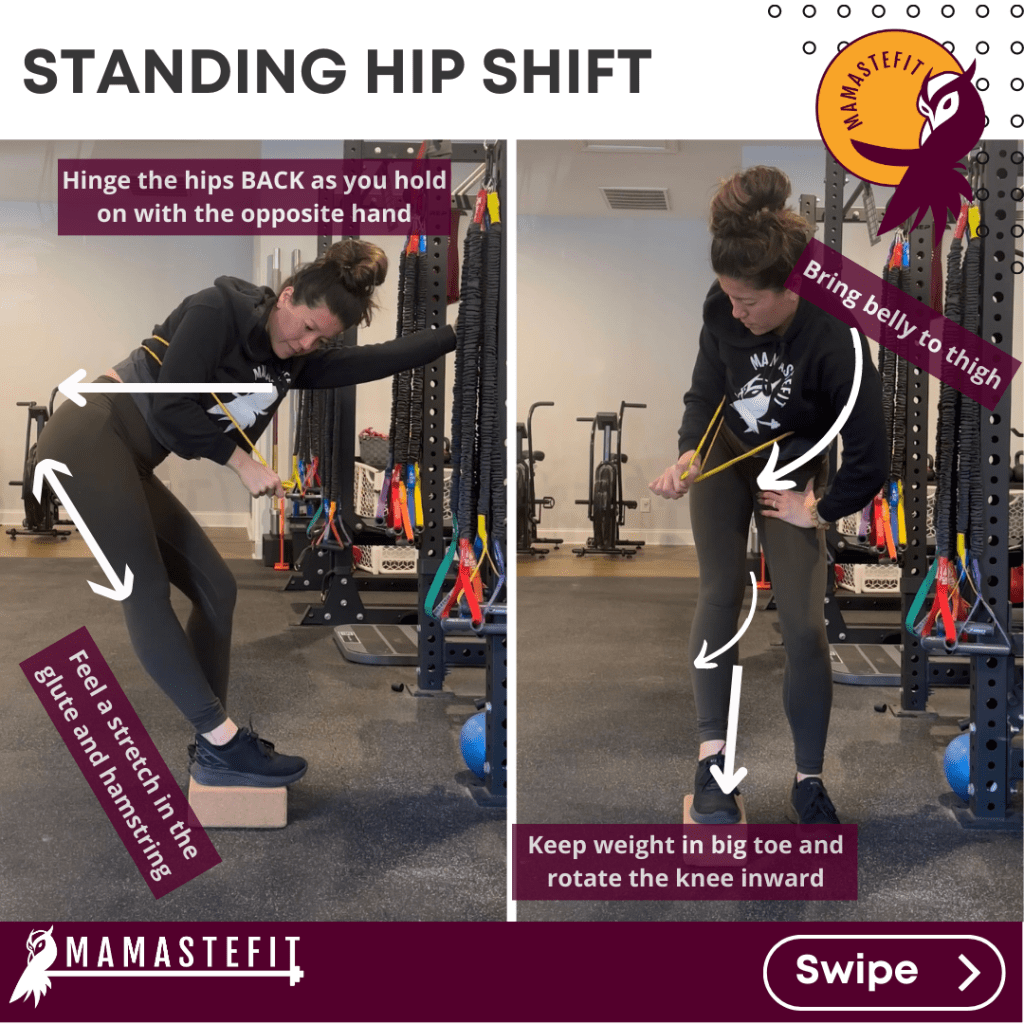
In the supported standing hip shift:
- Hold onto a sturdy structure with one hand
- Put weight into the opposite leg (this will be the leg we are finding internal rotation on)
- You can elevate the foot on a yoga block or keep it on the floor
- Hinge forward at the hips (think butt to wall behind you, not the floor below you)
- You will feel a stretch in the lats across the back to the elevate hip side
- Focus your weight into your big toe side of the foot
- Think rotate your knee inward without moving the foot
- You should feel more of a stretch in the glute and hamstring, targeting the back hip pocket (space between your sacrum and sitz bone)
- Find a slight rounding in the back, and you may find that you feel this stretch even more
- Inhale to focus on expanding in the back, exhale to release
Watch the video for a breakdown on how to do this exercise!
As we prepare for birth, we need to also consider our pelvic floor’s preparation! The pelvic floor plays a large role in our pregnancy and birth. But releasing the pelvic floor is more than doing deep squats and butterfly poses.
Our pelvic position is influenced by so much more than just the pelvic floor. How our thoracic spine is positioned can influence how we can move our pelvis, and thus our pelvic floor.
In our preparation for birth course, we break down the WHY behind birth preparation for the pelvic floor, plus include thoracic and hip mobility exercises so you can better position your pelvis. Then we explore pelvic floor relaxation exercises and teach you how to move your pelvic floor for better function and an easier labor!
This course explore your pelvic floor anatomy, function, and how to prepare your pelvic floor for birth! This course includes educational videos, mobility exercises, relaxation drills, and how to relax your pelvic floor during labor tips.
- 2+ hours of on-demand videos
- Immediate and lifetime of the course access
- Watch on Mobile Device
Open Each Pelvic Level
As we prepare for birth, we want to ensure that we can open each pelvic level! There are three main pelvic levels:
- Pelvic Inlet: Top of the Pelvis
- Baby enters or engages into the pelvis in this pelvic level
- The Midpelvis: The Middle of the Pelvis
- Baby rotates through this pelvic level
- Pelvic Outlet: The Bottom of the Pelvis
- Baby extends their head under the pubic bone and is born through this pelvic level
Our prenatal workouts can include exercises that focus on the movement patterns necessary to open each pelvic level. Ensuring that we have the ability to open each pelvic level could prevent labor stalls!
3) Hip Flexor with Side Body Opener: Top of the Pelvis
The top of the pelvis opens more with external rotation and a posterior pelvic tilt. External rotation is usually easy to find, as it’s a common postural tendency.
An anterior pelvic tilt (arching in the back) makes external rotation easier to find and can change the pelvic angle, so being able to move the pelvis from front to back is beneficial. But for many of us, we may find that the posterior pelvic tilt is a bit challenging or feels restrictive.
If we can release the front side of the leg, it may be easier to find a posterior pelvic tilt and open the pelvic inlet.

In this mobility exercise, we will release the hip flexor with a side body opener for the lats.
Tips:
- Start in a half-kneeling position
- Tucking the butt under and pushing the hips forward to feel more of a stretch.
- Reach overhead with the same side arm to feel a stretch in the side body
- Explore rotating the upper body to feel a stretch in different parts of the torso
- Hold this position for 10-20 breaths
Watch the video for a breakdown on how to do this exercise!
If you want more of a breakdown of WHAT to do throughout your prenatal workouts, check out our prenatal fitness programs! We offer it in two formats:
- 40-Week Prenatal Strength in the Teambuildr App (traditional delivery format)
- Full Version: Workouts 45-75 minutes in length, designed for the athlete with gym access or a home gym set up
- Mini Version: Workouts 15-20 minutes in length, designed for the busy person!
- Prenatal On-Demand with full-length workout videos that you follow along as you workout
4) Step Ups with Internal Rotation: Middle of the Pelvis
The middle of the pelvis opens more with asymmetrical external and internal rotation. We need to be able to shift our weight from leg to leg and rotate the hip!
For many of us, external rotation is easy to find BUT internal rotation is more challenging! If we cannot find internal rotation, we may experience a late labor stall as baby tries to finish their rotation under the pubic bone.
Step-ups, and other single-leg exercises, are a great way to find internal rotation as we prepare for birth!

As you do the step-up:
- Step the foot onto the box, then put weight into that foot
- Keeping the knee stacked over the ankle, rotate the opposite hip toward the forward knee
- You should feel more of a stretch in the hamstring and glute as you do this
- Exhale to step up as you extend in the hip and face forward
- Inhale to lower as you find internal rotation again
- Option to add a banded row to emphasize the lat movement, as well
Watch the video for a breakdown on how to do this exercise!
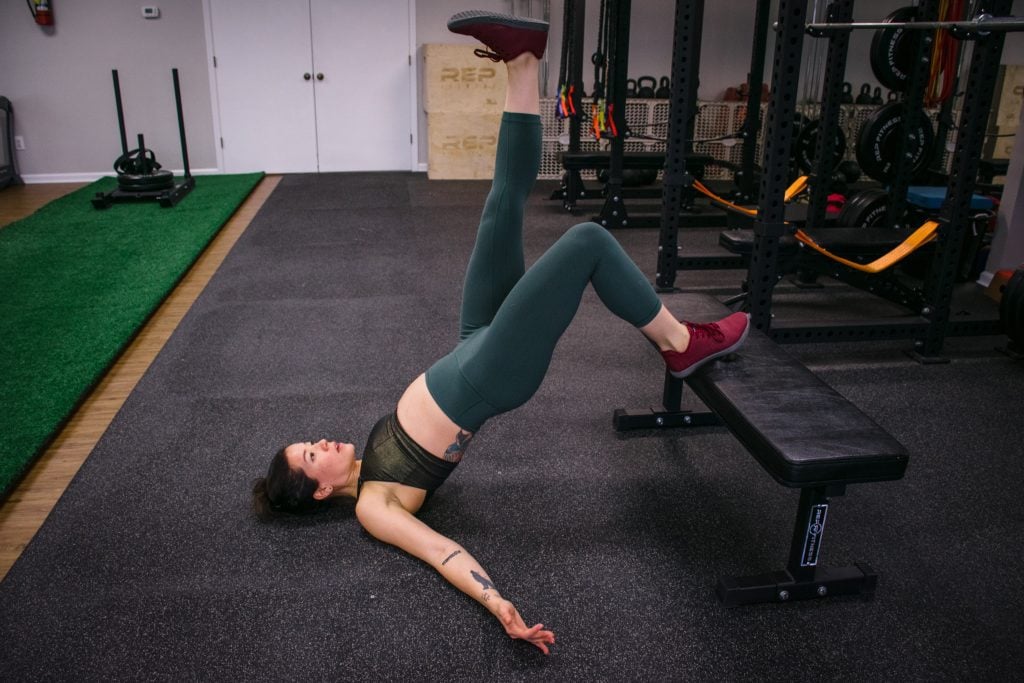
5) Hamstring Curls: The Bottom of the Pelvis
The bottom of the pelvis opens more with internal rotation of the femur! The hamstring plays a large role in finding internal rotation, so focusing on strengthening the hamstring can be helpful as we prepare for birth!
The hamstring curl is a low equipment option that focuses on one or both legs at the same time.
Support Your Baby's Position with Prenatal Exercise
We can support our baby getting into their BEST position for birth by ensuring that their path to rotate is clear! This includes releasing the uterine ligaments, posterior pelvic floor, and ensuring each pelvic level can open. Our baby’s position is NOT random, but rather a response to the space available for them.