

Table of Contents
Whether you’re pregnant, postpartum, or simply spending too many hours hunched over a laptop, back discomfort can quickly derail your day. Thankfully, with just three pieces of equipment—a medium‐light dumbbell, a long resistance band, and a yoga block—you can release tension, improve spinal mobility, and build the supportive strength your back needs. I’ll guide you through a step-by-step flow of pregnancy back pain exercises to leave your upper and lower back feeling limber, stable, and ready for whatever life (or motherhood!) throws your way.
Subscribe to our YouTube Channel for more weekly workouts and educational videos! We publish one new workout video and 2-3 educational videos a week on our channel.
Why These Pregnancy Back Pain Exercises Work
Releases built-up tension. Pregnancy, postpartum life, and desk work all tend to lock up the hips, thoracic spine, and shoulder girdle. Gentle mobility “unfreezes” these areas.
Improves movement quality. When your spine and pelvis glide smoothly, you’ll stand taller, breathe easier, and move with more fluidity—whether you’re lifting a baby or lifting weights.
Builds resilience. Light strengthening of the deep core, glutes, and upper-back muscles helps protect your spine from daily stresses and prevents future aches.
Equipment & Setup
Medium-light dumbbell (choose a weight you can press comfortably overhead 8–10 times)
Long resistance band (with or without a door/wall anchor)
Yoga block
Once you’ve got these three items, clear a little floor space and let’s get started!
Part 1: Hip-Shifted Pelvic Tilts & Thoracic Rotations
Purpose: Improve pelvis-on-femur mobility, gently activate your core, and free up your thoracic spine.
Block-Elevated Tabletop
Place your right knee on the block, left knee and both hands on the floor.
Shift your rib cage and weight over your right side so you can lift the opposite limbs without rocking your hips.
Pelvic Tilts (×10)
Inhale: drop belly toward the floor (arch your back).
Exhale: round your back, pull belly toward spine.
Tilt with Thoracic Rotation (×10)
From the rounded position, reach your left arm up toward the ceiling, then bring it back down to the floor.
Drop belly, round back, then reach up again.
Opposite-Hand Lifts (×3)
With rib cage shifted, lift your left hand off the floor, then lower.
Opposite-Knee Lifts (×3)
Keeping weight shifted, lift your left knee off the floor, then place back down.
Switch Sides
Move the block under your left knee and repeat steps 2–5 on your right side.
Part 2: Supine Upper-Back Strength & Mobility
Purpose: Enhance scapular mobility, strengthen the posterior shoulder-upper-back complex, and relieve neck tension.
90/90 Roll & Press (×10 each side)
Lie on your back with one leg straight, opposite hip and knee bent to 90°.
Hold dumbbell in the same hand as your bent knee, other arm out to the side.
Roll onto your side as you press the dumbbell overhead; roll back to supine.
Thoracic Extension & Scapular “Pump” (×4)
Lying on your back, reach both arms up toward the ceiling, rounding your upper back to reach farther.
Lower arms, squeeze shoulder blades together. Keeping the elbows on the floor, rotate the arms up (external rotation) then rotate the arms down (internal rotation). Return back up and reach both arms up toward the ceiling, repeating the circuit 4-6 times.
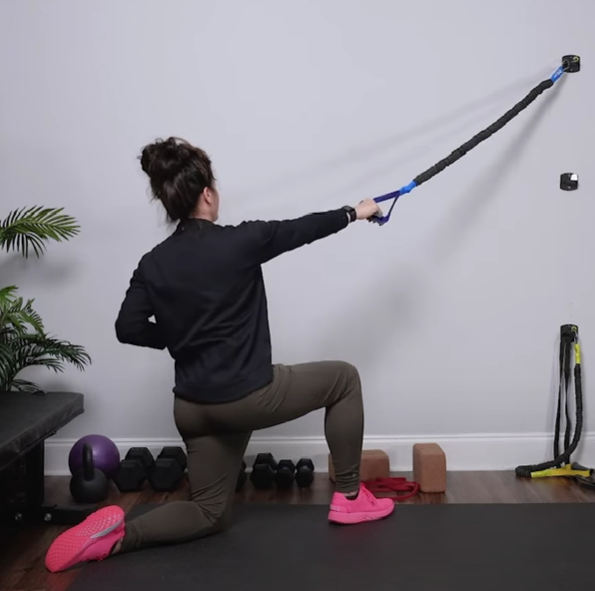
Part 3: Half-Kneeling Archer Rows
Purpose: Combine thoracic rotation, side-bending, and scapular activation for full-body integration.
Set-Up
Anchor band at eye level (or loop around your hands if unanchored).
Half-kneel with the knee on the same side as your “working” arm up in front.
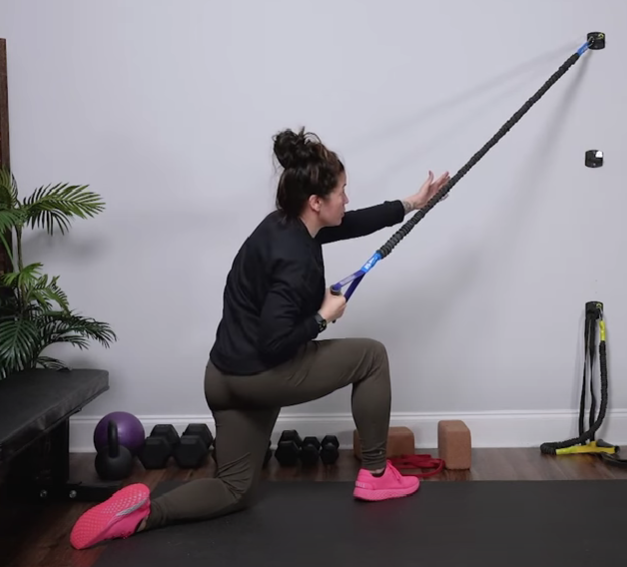
Archer Row (×10 each side)
From a tall half-kneel, twist your torso toward the front leg.
Exhale: pull the band back (row), while pulling the rib cage in and down toward the pelvis.
Inhale: reach forward, untwisting.
Switch Sides
Move into the opposite half-kneel and repeat the same 10-rep sequence.
Final Thoughts
By weaving this mobility and strength flow into your routine—whether during pregnancy, postpartum, or anytime you’re craving a more comfortable back—you’ll cultivate greater freedom in your spine, hips, and shoulders. Spend just a few focused minutes on these exercises when stiffness strikes, and notice how quickly tension melts away.
Ready to level up? We release new workouts every Tuesday on the MamasteFit YouTube channel, plus full prenatal and postpartum training programs at mamastefit.com. Use code YOUTUBE10 for 10% off any course (or bundle for 25% off total!). Move well, feel strong, and enjoy a pain-free journey through motherhood and beyond.
Prenatal Support Courses


Learn the science of pregnancy and birth to take the mystery of labor away! Understand why you are feeling what you feel, and learn strategies to confidently move through pregnancy and birth!
- 9h+ of Video
- Support Group
- Close Captioning

- 5 Workouts/Week
- Gym Workouts
- Self-Paced

Instructor
GINA
Workout on-demand with our prenatal fitness workout videos! Each workout is 30-40 minutes to follow along as you exercise at the same time!
- Birth Prep
- All Trimesters
- Mobility Work

Instructor
GINA
Find comfort and relief from pelvic girdle pain throughout your pregnancy and postpartum period! This program incorporates myofascial sling focused exercises to stabilize across the pelvic girdle joints.
- 3 Weeks
- On Demand Workout Videos to Follow