

We can use our prenatal workouts to prepare for birth! Prenatal fitness can support:
- Staying strong throughout your pregnancy so you can meet daily demands, such as picking up your kids and all the things
- Keeping your comfortable and pain-free so you can move with ease! Pregnancy does NOT mean you need to be in pain.
- Prepare for birth by ensuring we have the movement capability to open each pelvic level!
As we prepare for birth, our prenatal workouts should consist of more than just a “normal” workout with “unsafe” prenatal exercises removed.
This is doing a disservice to your pregnancy and birth prep! It would be like a powerlifter doing a running workout.
We want our prenatal workouts to be designed FOR pregnancy, not modified from another program meant for the general population!
Let’s explore some exercises you can include in your prenatal workouts (that we already include in our prenatal fitness programs) so you can prepare to open your pelvis for birth!
When we are laboring, we are moving to create more space in the pelvis! The pelvis has three main levels:
- The Inlet, or the top of the pelvis
- The Midpelvis, or the middle bony portion of the pelvis + the pelvic floor
- The Outlet, or the bottom of the pelvis
This course includes our 90-minute labor biomechanics webinar recording plus our 24-page labor biomechanics quick reference guide.
- 90-min webinar
- 24-Page E-Book
- Upcoming Live Webinar & Q&A
- Watch on Mobile Device
Each of these pelvic levels opens more with different types of movement patterns. There is NO one movement that will open ALL the pelvic levels.
The movements that open each pelvic level include:
- Inlet:
- External rotation, or open hip positions, plus pelvic tilting front to back
- Midpelvis:
- External AND internal rotation, weight shifting from side to side
- Posterior pelvic floor release
- Outlet:
- Internal rotation, or closed hip positions, plus a slight posterior pelvic tilt
- Posterior pelvic floor release
Want to learn more about labor biomechanics and HOW to open the pelvis during birth? Join our childbirth education courses
We can incorporate exercises into our prenatal workout routine that focus on opening each of these pelvic levels. This will ensure that we CAN open each pelvic level during labor!
One major contributor to labor stall (that may lead towards an unplanned cesarean birth) is the inability to open a specific pelvic level that the baby gets “stuck” in during birth.
If we can ensure that we CAN open each pelvic level and that we have limited restrictions in our hip mobility, we may find that we can have an easier labor!
Prepare to Open the Top of the Pelvis: Inlet Openers
1. Supported Squat Back Expansion Breathing Drill
The top of the pelvis opens more with:
- External rotation of the femurs (wide knees or an open hip position)
- Posterior pelvic tilt (tucking the butt underneath)
- And an anterior pelvic tilt can adjust the pelvic angle + makes external rotation easier
When preparing to open the top of the pelvis, we want to focus on creating more space by having the knees wide AND pelvic tilting.
This could include movements like squats, sumo deadlifts, lunges, and any leg-based movement with an open hip position that involves hip extension.
Fortunately, its usually pretty easy to open the top of the pelvis since prenatal postural tendencies favor opening the inlet:
- We tend to stand with more external rotation, or toes out, to create more space for belly
- We tend to be more extended in an anterior pelvic tilt which makes external rotation easier to find
But a posterior pelvic tilt can change the pelvic diameter and make the actual pelvic inlet LARGER!
So, if we are always favoring an extended position (aka more of an anterior pelvic tilt), we need to also be able to find an posterior position!
This is where finding expansion in the back can help with opening the TOP of the pelvis!
The supported squat back expansion breathing drill focuses on releasing the backside in a deep squat position (which means it’s really opening the top of the pelvis).
In this movement:
- Hold onto a sturdy structure
- Drop into the bottom of a squat while using your arms as support
- You should feel that your legs can relax
- If needed, add some support under your heels if ankle mobility is limited
- Round in your back as you inhale to feel the back expand
- Exhale to relax
Watch the video for a breakdown on how to do this exercise!
As we prepare for birth, we want to focus on thoracic AND pelvic mobility to support pelvic positioning to release the pelvic floor. You’ll find that this blog is filled with movements that also incorporate the thoracic spine, as opening the pelvis is MORE than just hip mobility!
If you want more on how to prep the pelvic floor (and pelvis) for birth, join our prepare your pelvic floor for birth course! It is a self-paced, online course that includes tons of mobility and relaxation exercises to prepare for birth!
2. All Fours Hip Shifted Pelvic Tilts
Next, we can prepare to open the inlet by ensuring we have pelvic mobility from front to back: can we tilt our pelvis posteriorly and anteriorly?
The top of the pelvis opens more with rocking in the pelvis. A posterior pelvic tilt (rounded back) creates more space front to back in the pelvic inlet.
While an anterior pelvic tilt changes the pelvic angle (which can make it easier for baby to enter into the pelvis) and also makes external rotation easier (hip positioning likely influences pelvic opening more so than the sacrum)
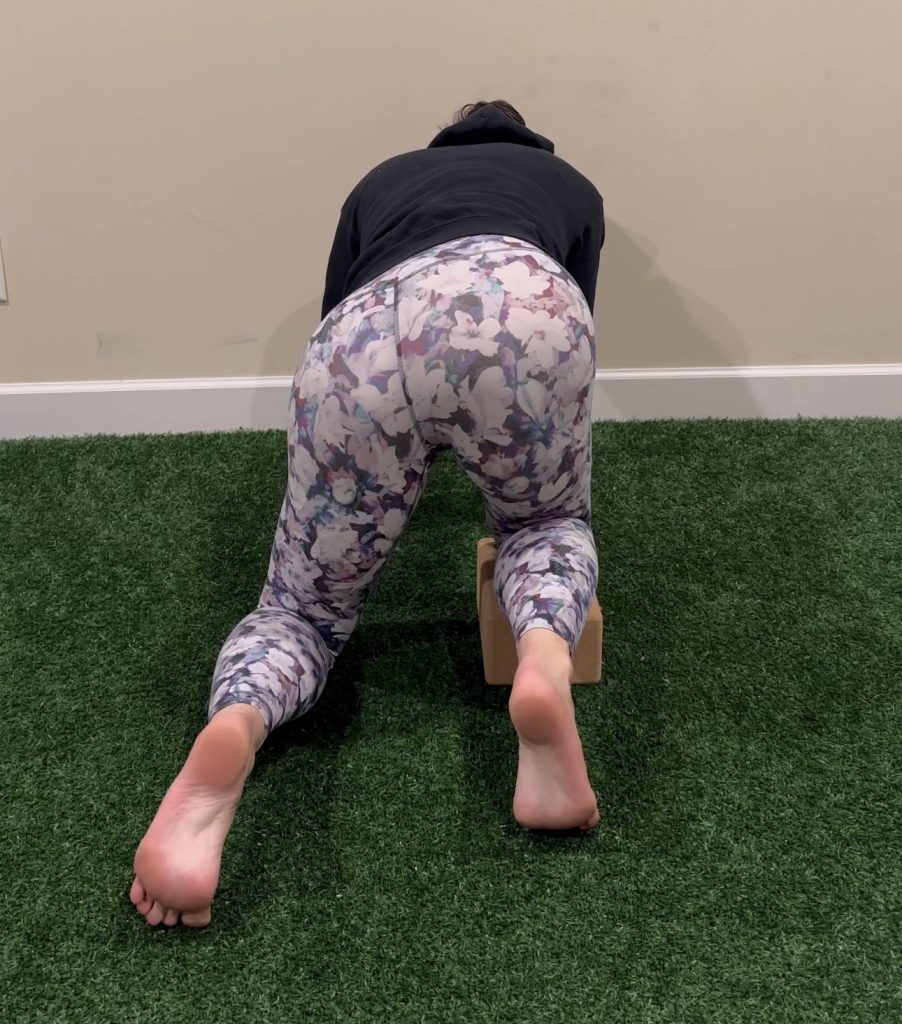
In all fours pelvic tilt, we are focusing on finding movement on each side with pelvic tilting! Typically, the posterior or rounded back position is harder to find (you got a big ole belly in the way and we tend to favor extension during pregnancy), so you will find the elevated side feels “tighter” or more restricted.
If you find that the posterior or rounded position is more challenging, pause at the rounded point and breathe instead of rushing through each repetition.
Movement tips:
- Starting in a table top position, place one knee on an elevated surface such as a yoga block
- Shift the weight towards the elevated knee, so the elevated hip is in more internal rotation
- Round in the back to feel more of a stretch in the elevated hip backside
- Then arch in the back to feel more of a stretch in the frontside of the lower knee.
- Be mindful that you are not straining as you extend in the spine
Watch the video for a breakdown on how to do this exercise!
Prepare to Open the Midpelvis Exercises
3. Supported Squat to Elevated Lunge
The midpelvis is the bony portion of the pelvis that baby has to ROTATE through during birth. This portion of the pelvis opens more with:
- Asymmetrical movement
- Weight shifting from side to side
- External AND internal rotation
The midpelvis has two levels: the upper and the lower. Each level opens a little differently BUT if you are shifting your weight from side to side, then you are opening both the upper and lower as you sway.
The upper midpelvis is where baby begins their rotation into the pelvis. We can open the upper midpelvis more with external rotation (only to one side) with an open hip position.
Think side lunges!
In the supported squat with elevated lunge, we are emphasizing external rotation! The deep, supported squat is helping you open the inlet and upper midpelvis, and then driving into the leg for an elevated lunge is emphasizing the upper midpelvis.
Movement tips:
- Hold onto a sturdy structure
- Drop into the bottom of a squat while using your arms as support
- Exhale to stand up
- Lift one foot onto an elevated surface, such as a bench
- Drive into the leg to feel a groin stretch
- Step the foot down and then repeat with another squat
- Repeat on both sides
Watch the video for a breakdown on how to do this exercise!
If you want more of a breakdown of WHAT to do throughout your prenatal workouts, check out our prenatal fitness programs! We offer it in two formats:
- 40-Week Prenatal Strength in the Teambuildr App (traditional delivery format)
- Prenatal On-Demand with full-length workout videos that you follow along as you workout
4. Side Body Opener: Support the Pelvic Position
As we noted before, the thoracic position and mobility influences HOW the pelvis can position and open! So, as we prepare for birth, we also want to include thoracic mobility!
The side body opening mobility exercises support the lateral movement of the thoracic spine. The side that is compressed tends to favor internal rotation, so releasing the side body can support finding more external rotation!

In the side seated side body opener:
- Start in a side seated position
- Drop the ribs towards the floor to feel a stretch in the side body (think armpit to top of hip)
- If you want to add more:
- Reach forward with the arm, but instead of trying to touch the wall in front of you, focus on pushing the chest AWAY from the hand
- This will help you feel it more in the side body and lats
- As you breathe, focus on feeling those ribs expand as if they were moving apart from one another
Watch the video for a breakdown on how to do this exercise!
Lower Half of the Pelvis: Lower Midpelvis and Outlet Openers
5. Staggered Stance RDL with Banded Row
As baby navigates through the midpelvis, they need to finish their rotation under the pubic bone to then be born.
Baby finishes their rotation under the pubic bone in the lower midpelvis! The lower midpelvis opens more with one sided internal rotation and releasing the posterior pelvic floor.
The lower midpelvis is where we may see more labor stalls. Internal rotation tends to be more difficult to find during pregnancy and is commonly neglected in many fitness programs (not just prenatal, but general population fitness programming as well).
We can create more space in the lower midpelvis by:
- Finding internal rotation of the femur
- Releasing the posterior pelvic floor
Finding and feeling internal rotation can be challenging! Some tips to try as you do this movement (and the next movement) include:
- Put weight into one leg (this will be the leg we are finding internal rotation on)
- Hinge forward at the hips (think butt to wall behind you, not the floor below you)
- Reach forward with your opposite arm
- In this exercise you will reach forward with the band
- Focus your weight into your big toe side of the foot
- Think rotate your knee inward without moving the foot
- You should feel more of a stretch in the glute and hamstring, targeting the back hip pocket (space between your sacrum and sitz bone)
- Find a slight rounding in the back, and you may find that you feel this stretch even more
Watch the video for a breakdown on how to do this exercise!
6. Standing Hip Shifted Breathing Drill: Release the Posterior Pelvic Floor and Find Internal Rotation
After we find more internal rotation with movement, we can focus on releasing the posterior pelvic floor to support opening the lower half of the pelvis.
The standing hip shifted breathing drill focuses on finding internal rotation to one side and releasing the pelvic floor.

Using the same movement cues as above, we can find a release in the posterior pelvic floor in this hip shifted position. (note that the following is similar from the section above)
- Hold onto a sturdy structure with one hand
- Put weight into the opposite leg (this will be the leg we are finding internal rotation on)
- You can elevate the foot on a yoga block or keep it on the floor
- Hinge forward at the hips (think butt to wall behind you, not the floor below you)
- You will feel a stretch in the lats across the back to the elevate hip side
- Focus your weight into your big toe side of the foot
- Think rotate your knee inward without moving the foot
- You should feel more of a stretch in the glute and hamstring, targeting the back hip pocket (space between your sacrum and sitz bone)
- Find a slight rounding in the back, and you may find that you feel this stretch even more
- Inhale to focus on expanding in the back, exhale to release
Watch the video for a breakdown on how to do this exercise!
Some folks find that these really active breathing drills (more upright and standing) make it harder to feel the pelvic floor because there is too much going on.
While others find that they need the increased demand to feel their pelvic floor moving. If you find that this standing drill is too much, try our sidelying hip shifted breathing drill!
Prenatal Fitness: Prepare to Open the Pelvis for Birth!
We can use our prenatal workouts to keep us comfortable and strong throughout our pregnancies but also prepare for birth!
One reason for labor stalls is the inability to create space in a specific pelvic level (usually the lower half). We can use our prenatal workouts to ensure that we have the movement capability to open each pelvic level!
Learn more on how to create space in the pelvis to prepare for birth in our online childbirth education course and our prenatal fitness programs!