
If you’ve been dealing with constipation, tailbone pain, deep glute discomfort, or nagging SI joint pain, you may have been told to strengthen your pelvic floor. While strengthening certainly has its place, it’s only one piece of the puzzle.
Sometimes, the issue isn’t weakness—it’s excessive tension.
When the muscles of the posterior (back) portion of the pelvic floor become overactive or tight, they can contribute to discomfort, difficulty having bowel movements, and restricted movement throughout the pelvis and hips. Learning how to intentionally release these muscles can improve comfort, mobility, and overall pelvic floor function.
In this 14-minute workout, we’ll guide you through gentle mobility and release exercises that target the back half of the pelvic floor using three different positions:
- Standing
- Seated
- All fours (quadruped)
These movements are restorative, accessible, and designed to help you move with less pain and more ease.
Subscribe to our YouTube Channel for more weekly workouts and educational videos! We publish one new workout video and 2-3 educational videos a week on our channel.
Why the Posterior Pelvic Floor Matters
The pelvic floor is a group of muscles that forms the base of your pelvis. Rather than functioning as isolated muscles, it works alongside your diaphragm, abdominal wall, hips, glutes, and lower back to provide stability, support, breathing coordination, and continence.
The posterior pelvic floor refers to the muscles toward the back of the pelvis, including the tissues surrounding the tailbone and deep hip rotators.

When these muscles become excessively tense, you may notice symptoms like:
- Constipation or difficulty relaxing during bowel movements
- Tailbone (coccyx) pain
- Deep glute discomfort
- SI joint pain
- Lower back tightness
- Pain with prolonged sitting
- Difficulty fully relaxing your pelvic floor
Many people immediately assume pelvic floor dysfunction means weakness. However, muscles that are constantly gripping can become just as dysfunctional as muscles that are underactive.
Learning to release tension is often an important first step before building strength.
Why Hip Position Changes Pelvic Floor Tension
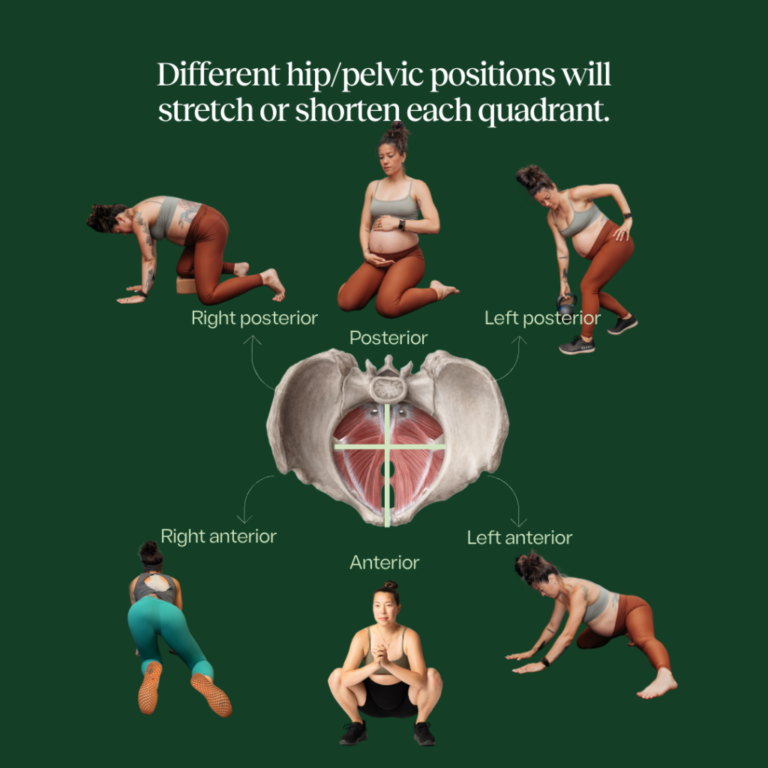
One of the most important concepts in this workout is that pelvic floor tension changes based on the position of your pelvis and hips.
As your pelvis rotates, tilts, and shifts over your femurs, different regions of the pelvic floor either lengthen or shorten.
Throughout this workout, you’ll intentionally use:
- Internal rotation of the standing hip
- Gentle posterior pelvic tilt
- Weight shifts
- Rounded spinal positions
- Controlled breathing
Together, these positions create space through the back half of the pelvic floor while reducing unnecessary muscle guarding.
Instead of aggressively stretching the muscles, you’re encouraging them to relax through positioning, breathing, and gentle movement.
Standing Hip Shift Release
The workout begins in standing using a yoga block under one foot.
This setup places one hip into a more “closed” position while encouraging the opposite side of the pelvis to rotate forward. Although subtle, this movement creates a significant stretch through the deep glute muscles and posterior pelvic floor.
Key cues include:
- Place one foot on a yoga block.
- Shift most of your weight into the standing leg.
- Press firmly through the big toe.
- Allow the standing knee to gently rotate inward.
- Reach the opposite arm forward.
- Slightly tuck the pelvis underneath using your hamstring—not by squeezing your glutes.
- Breathe deeply.
The goal isn’t to force the movement but to gradually allow the pelvis to rotate while maintaining stability through the standing leg.
Many people notice a deep stretch in the glute muscles that extends toward the tailbone.

Using Opposite Glute Activation to Deepen the Stretch
Once you’ve found the standing position, the workout introduces a wall variation.
By pressing the opposite knee into a wall, you activate the opposite glute. Surprisingly, this often helps the targeted hip relax even more.
This works because activating muscles on one side of the pelvis can influence tension throughout the pelvic floor and hips, encouraging the opposite side to lengthen.
Rather than forcing a stretch, your nervous system is using muscular activation to create a more effective release.
If you don’t initially feel much during the standing hip shift, this variation often makes a noticeable difference.

Back Expansion: Breathing into the Posterior Pelvic Floor
After the standing hip shift, you’ll perform a back expansion exercise.
This movement is deceptively simple but incredibly effective.
Using a yoga block between your thighs, you’ll:
- Gently squeeze the block
- Sit slightly back
- Allow the tailbone to reach toward the floor
- Round through the lower back
- Take slow diaphragmatic breaths
Most of us spend our day standing with some degree of lumbar extension (an arched lower back). While this isn’t inherently bad, constantly living in extension can increase compression through the lumbar spine and the posterior pelvic floor.
By intentionally rounding the spine and breathing into the back ribs, you’re encouraging those tissues to soften and expand.
Many people immediately notice a feeling of decompression across the lower back.

Seated Hip Shifts for Pelvic Floor Relaxation
The next section moves into seated hip shifts, making these exercises easy to perform on:
- A chair
- A birth ball
- Even while sitting on the toilet
This can be especially helpful for individuals struggling with constipation.
Rather than staying perfectly centered, you’ll shift one hip slightly backward while allowing the opposite knee to move forward.
Adding gentle pressure with your hand against the forward knee increases muscular activation while helping guide the pelvis into a more effective release position.
One unique cue included in this workout is gently pressing your thumb and pinky together.
Although this may seem unrelated, small neurological cues like this can sometimes improve body awareness and help direct relaxation toward the posterior pelvic floor.
Unlike the standing version, these seated movements are intentionally less intense.
Sometimes the body doesn’t need more stretching—it needs more downregulation.
Giving the nervous system permission to relax can be just as valuable as increasing flexibility.


Restorative Forward Fold for Lower Back and Pelvic Floor Release
Following the seated hip shifts, you’ll revisit back expansion.
If you’re using a birth ball, simply drape your torso over the ball and allow your entire body to soften.
Focus on:
- Slow inhales
- Complete exhales
- Relaxing your shoulders
- Letting your lower back widen
Rather than stretching aggressively, you’re allowing gravity and breathing to help decrease muscle tone throughout the back half of the pelvis.
This restorative position can feel especially good after long days of standing, lifting children, or sitting for extended periods.
If you do not have a birth ball, you can perform this movement seated or standing.


All Fours Posterior Pelvic Floor Release
The final section moves into quadruped (all fours).
Using a yoga block beneath one knee, you’ll shift your weight toward that side while creating:
- A slight posterior pelvic tilt
- Gentle rounding through the back
- Core engagement
- Hamstring activation
- Controlled weight shift into the hip
Again, the emphasis isn’t on forcing a stretch.
Instead, you’re positioning the pelvis to naturally lengthen the tissues surrounding the deep glutes and posterior pelvic floor.
If additional release is needed, you can once again use the wall variation to activate the opposite glute.
Many people notice one side feels significantly tighter than the other.
That’s completely normal.
Our bodies naturally have asymmetries, and one hip often sits differently than the other. The goal isn’t perfect symmetry—it’s improving balance and awareness.


Finishing with Child's Pose (or a Pregnancy-Friendly Alternative)
The workout concludes with one final restorative breathing exercise.
If you’re postpartum or not heavily pregnant, Child’s Pose provides an excellent opportunity to lengthen the entire posterior chain while encouraging pelvic floor relaxation.
If you’re in the later stages of pregnancy, a modified version with wider knees and a more upright position creates similar benefits without placing pressure on your abdomen.
Adding a pillow or exercise ball beneath your torso can further encourage relaxation while providing comfortable support.
This isn’t about stretching to your maximum range.
It’s about creating a safe environment where your nervous system feels comfortable letting go of unnecessary tension.


Why Relaxation Is Just as Important as Strength
One of the biggest misconceptions surrounding pelvic floor health is that every symptom requires strengthening.
In reality, muscles function best when they can both contract and relax.
If a muscle remains chronically tense, strengthening alone often reinforces the problem rather than solving it.
An effective pelvic floor program should include:
- Mobility
- Breathing mechanics
- Strength training
- Pelvic floor coordination
- Recovery and relaxation
Each piece supports the others.
Balance—not constant tightening—is what ultimately leads to better movement and less pain.

When These Exercises May Help
This workout may be beneficial if you’re experiencing:
- Constipation caused by difficulty relaxing during bowel movements
- Tailbone pain
- SI joint discomfort
- Deep glute tightness
- Lower back tension
- Pelvic floor overactivity
- Pregnancy-related pelvic discomfort
- Postpartum pelvic tightness
If your symptoms are severe, worsening, or accompanied by numbness, significant weakness, or bowel and bladder changes, consult your healthcare provider or a pelvic floor physical therapist before beginning any exercise program.
Conclusion
Releasing tension in the posterior pelvic floor doesn’t require complicated equipment or aggressive stretching. Often, simple positional changes, intentional breathing, and controlled weight shifts are enough to help your body relax and move more comfortably.
This 14-minute routine combines standing, seated, and all-fours variations so you can explore which movements feel best for your body. Whether you’re navigating pregnancy, recovering postpartum, or simply dealing with chronic pelvic tension, incorporating these restorative exercises into your weekly routine can help improve mobility, decrease discomfort, and support healthier pelvic floor function.
Remember, your pelvic floor doesn’t just need to be strong—it also needs to be adaptable. Building both strength and relaxation is what allows these muscles to support you through every stage of motherhood and beyond. If you’d like additional guidance in your journey, don’t forget to check out our online fitness programs and use code YOUTUBE10 for 10% off any online course.
Prenatal Support Courses


Learn the science of pregnancy and birth to take the mystery of labor away! Understand why you are feeling what you feel, and learn strategies to confidently move through pregnancy and birth!
- 9h+ of Video
- Support Group
- Close Captioning

- 5 Workouts/Week
- Gym Workouts
- Self-Paced

Instructor
GINA
Workout on-demand with our prenatal fitness workout videos! Each workout is 30-40 minutes to follow along as you exercise at the same time!
- Birth Prep
- All Trimesters
- Mobility Work

Instructor
GINA
Find comfort and relief from pelvic girdle pain throughout your pregnancy and postpartum period! This program incorporates myofascial sling focused exercises to stabilize across the pelvic girdle joints.
- 3 Weeks
- On Demand Workout Videos to Follow