

Table of Contents
Week 38: Prenatal Workout and Birth Preparation
In the final four weeks of the MamasteFit Prenatal Strength Program, we decreased overall volume and modified to more bodyweight/lighter weight exercises. This decrease in overall volume and intensity helps to taper in preparation for birth. We want to maintain our fitness in these final weeks, as it can support an easier recovery postpartum, but we don’t want to be sore when labor comes. The taper can be compared to the decrease in workout volume before a sports competition (not that birth is a competition) that you may have done as an athlete.
This week, I am modifying my movements to primarily use resistance bands and free weights (dumbbells or kettlebells). This makes the setup for my workouts much faster, and I am not lifting quite as heavily as I did earlier in my pregnancy. My workouts are around 30-40 minutes in length. I feel more fatigued at this point in my pregnancy, so the lower intensity accommodates my overall energy levels.
The overall structure of my workout includes:
- Warm Up: MamasteFit Birth Prep Circuit
- Additional Warm Up (not programmed):
- Pelvic Floor Exercises from my pelvic floor PT, Hayley Kava
- Hip Mobility Exercises
- Strength Exercises with Accessory Work
- Cool Down Birth Prep Mobility
Later in the day, I’ll go for a 20-30-minute long easy walk to get in some cardio. It’s pretty hot in the summer here in North Carolina, so I tend to wait until the evenings to do my walks.
Here is what my workout looks like in the Teambuildr app–the fitness app that we deliver the MamasteFit app based programs.

Now, let’s breakdown each part of my workout so you can better understand what I am doing to support the final days/weeks as I prep for my upcoming birth! My workout includes exercises to keep me strong and comfortable, create more space within my pelvis, support my baby’s position, and release tension in my pelvic floor. Our workout programs are very intentionally designed based on years of experience working with in-person prenatal fitness, supporting in-person births as a doula and labor nurse, and working with thousands of online clients.
Warm Up: The MamasteFit Birth Prep Circuit
I start every workout after 20 weeks of pregnancy with the MamasteFit Birth Prep Circuit. The birth prep circuit is designed to release common areas of tension to make it easier for you to open your pelvis, support your baby’s position for birth, and release tension in the pelvic floor.
During pregnancy, most of us tend to favor more external hip rotation (toes out) and extension in the spine (arched back). In addition, we also tend to favor more weight in the right leg. This results in common areas of tension that may make it harder to find certain positions–primarily the ability to round our back and find internal hip rotation. The birth prep circuit addresses these issues!
The MamasteFit Birth Prep Circuit includes:
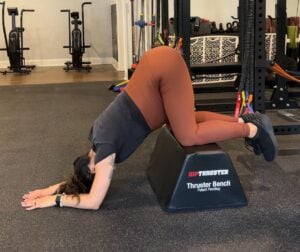
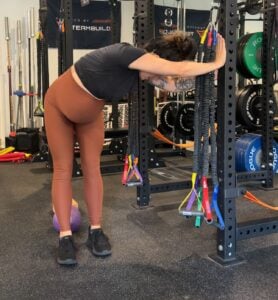
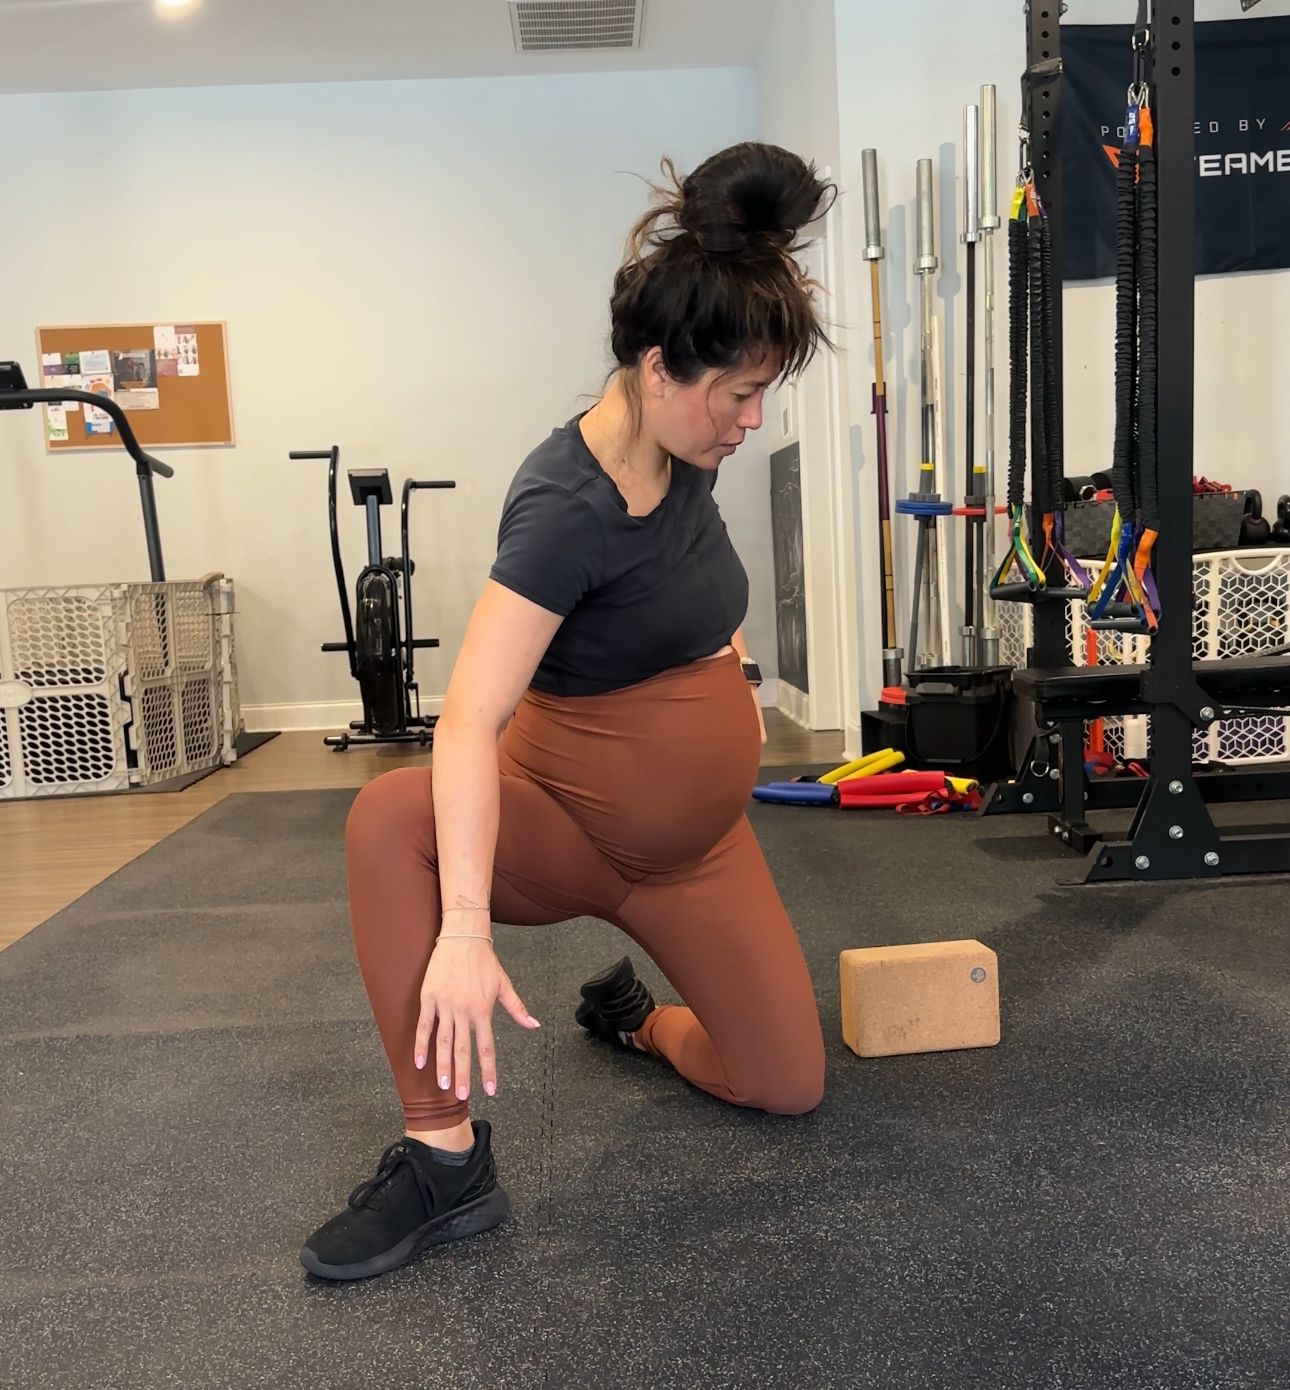
- Forward Leaning Inversion: This helps to release tension in the lower uterine ligaments to help baby get into a head down position and tuck their chin. Inversions do not flip babies–so if baby is head down they are still beneficial–but rather they create MORE space in the lower uterus to help baby get into a better position.
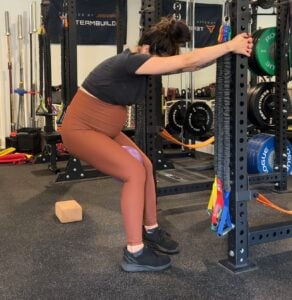
- Half Kneeling Hip Flexor Release: This helps to release tension in the front of the thigh/pelvis. The hip flexors tend to be tighter due to favoring a more extended spine position. If our hip flexors are too tight, it can make it harder to find a posterior pelvic tilt (rounded back) which can decrease space in the pelvis for your baby.
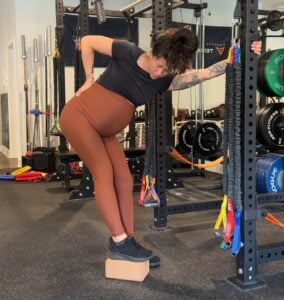
- Forward Leaning Lat Release: simliar to the hip flexor release, this release helps you find a more rounded position.
- Back Expansion Breathing Drill: after the releases, we can focus on trying to find more expansion in the rib cage. If the rib cage has restricted mobility, it can put too much pressure down onto the pelvic floor or abdominal wall–finding this expansion helps to release tension in the posterior pelvic floor and lats.
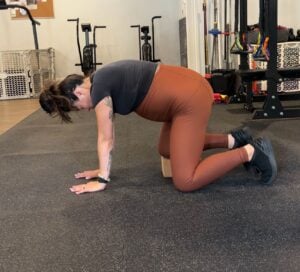
- All Fours Hip Shift with Pelvic Tilts: this hip shifted exercise targets the posterior pelvic floor on the elevated hip (where we hold more tension).
- Standing Hip Shift: this static exercise also targets the posterior pelvic floor.
Check out this YouTube workout video for a step-by-step guide through our birth prep circuit, where I explain exactly WHY we chose these specific exercises!
Don’t forget to subscribe to our YouTube channel! It’s completely free, and your support through subscriptions and views helps us continue creating more free content for you on our platforms!
The MamasteFit Birth Preparation Circuit is a carefully designed series of exercises that focuses on releasing common areas of prenatal tension, ultimately making it easier for your baby to rotate and move through the pelvis during labor. This circuit emphasizes movements that facilitate internal rotation of the hip and a posterior pelvic tilt, which are crucial for creating space in the pelvis and optimizing the baby’s position for birth. This circuit prepares the pelvis and releases tension in the posterior pelvic floor by incorporating forward-leaning inversions, back expansion breathing drills, and hip-shifted pelvic tilts. Practicing this circuit regularly, starting after 20 weeks of pregnancy, can be instrumental in achieving a smoother and more comfortable labor experience.
Grab the free PDF guide below by signing up for our newsletter!
Pelvic Floor Prep Exercises: Release Tension for Birth
The pelvic floor plays a large role in our daily function, but also a significant role in our labors. The pelvic floor is also a bit of a buzzword when it comes to birth prep, but there is not always a good understanding of HOW to prep the pelvic floor for birth.
The pelvic floor attaches to the pelvic bones–so different pelvic/hip positions create different types of tension/release throughout the pelvic floor. This means no one movement stretches the entire pelvic floor–and many of us have different areas of tension based on our common movement patterns and postural tendencies.
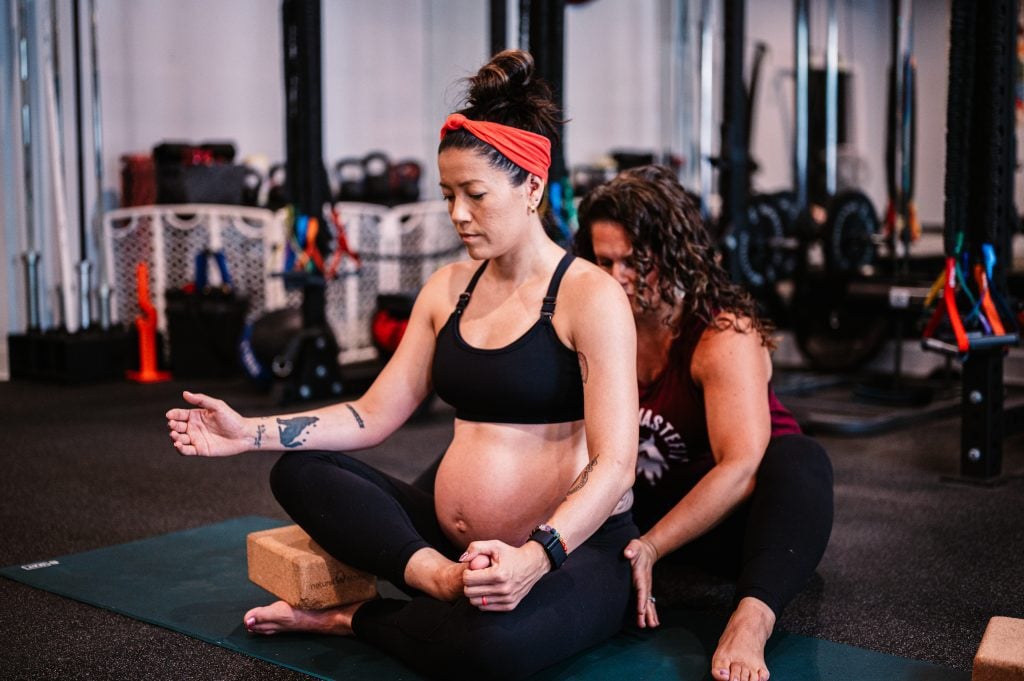
The right side of my pelvic floor tends to be overactive, and the posterior half is a bit tighter than the anterior portion. This is a common state of tension on most of our pelvic floors! In my pelvic floor prep, I am focusing on offloading my right side pelvic floor by shifting to the left leg and stretching the right upper inner thigh/groin.
With the guidance of my pelvic floor physical therapist, Hayley Kava, I am also using a pelvic wand for internal pelvic floor release of the right posterior pelvic floor.
1) All Fours Hip Shift Adductor Release and Half Lunge Adductor Release

In both exercises, I am shifting primarily to the left leg to feel more of a stretch in the left hip pocket area (deep glute). You can think of rotating the belly to the left thigh to find a closed hip position to the left leg. Then, I shift my weight until I feel more of a stretch in the right groin area. I will maintain this position for about ten cycles of breath or 30-60 seconds.
Watch the YouTube video for more of a breakdown of how I am doing the half-kneeling variation of this adductor release.
Preparing the pelvic floor for birth involves much more than just deep squats, butterfly poses, or other wide-legged positions. It’s essential to incorporate a variety of hip positions (wide knees, knees in, asymmetrical) while also paying attention to the alignment of the rib cage and pelvis. In our Pelvic Floor Prep for Birth course, we go into greater detail on HOW to engage and move your pelvic floor using different exercises and mobility flows to support your birth preparation fully.

This course explore your pelvic floor anatomy, function, and how to prepare your pelvic floor for birth! This course includes educational videos, mobility exercises, relaxation drills, and how to relax your pelvic floor during labor tips.
- 2h+ of Video
- Mobility Flows
- Lifetime Access
2) Standing Hip Shift with Mini-Band

Another pelvic floor exercise that I am doing is hip shifts. Hip shifts are vital for pelvic floor function! When we walk, we should be shifting our weight from hip to hip–this alternates the length/shortening of our glutes and pelvic floor (which improves their function over a more extended range of motion) and improves hip stability. In addition, hip shifts help stretch the posterior pelvic floor (where a lot of us are tighter) to improve sacral mobility. This allows us to create more space in the lower midpelvis to help your baby’s final rotation during birth.
In this standing variation, I am adding a mini band to increase the glute activation of my support leg, which brings me deeper into the hip shift’s release. Watch the video for a walk through of how to do this exercise.
Hip Mobility Exercises: Open the Hips for Birth
90/90 Side Camel and Switches
After my pelvic floor release exercises, I would like to add some hip mobility exercises, like the 90/90. The 90/90 variations have been my favorite this pregnancy, so I do a short flow of:
- 90/90 Side Body Opener
- 90/90 Side Camel
- 90/90 Switches


The 90/90 movements include external and internal hip rotation. These movements help to open the middle of the pelvis asymmetrically and release tension diagonally in the pelvic floor. The side body opener improves rib cage mobility! You may not realize that your rib cage mobility and position can influence your pelvic floor tension.
If our rib cage is more thrust upward (think arching more in the back), it can distribute pressure more towards the front of the pelvic floor, decreasing movement in the posterior pelvic floor. This forward thrust (known as rib flare) can tighten the posterior pelvic floor and actually push your baby forward, making it harder for them to engage into the pelvis!
If you want more daily workouts to support a strong pregnancy as you prepare for birth, join our online prenatal fitness programs!
MamasteFit is unique in that we are one of the ONLY prenatal/postnatal training facilities in the United States. We develop our workout programs from our experience of working with in-person pre/postnatal fitness clients and work closely with physical therapists to refine our programming. In addition, we are birth workers, so we combine our experience as perinatal fitness trainers and birth professionals to ensure that our programs actually support your birth preparation and recovery!
Our prenatal fitness programs are offered in several formats:
- 40-Week Prenatal Strength Program in the Teambuildr App:
- This program is a self-paced workout with shorter demo videos. This is ideal if you like to workout in a gym setting and prefer a traditional workout delivery format.
- This program syncs to your current week of pregnancy, so you can start anytime, with one-time payment or month-to-month payment options.
- This program has a full and mini version, depending on how much time you have to dedicate to workouts!
- Prenatal On-Demand Fitness Program:
- If you prefer to follow a video as you workout at the same time, this workout program will be the best option!
- This program syncs to your current trimester, so you can grab the trimesters you need!
- Birth Prep Workout Program:
- If you already have a workout routine or you only want birth prep-focused workouts, check out this program!
- This program includes full-length workout videos to follow as you workout at the same time.
- Prenatal Yoga Classes:
- If you want prenatal yoga, join our prenatal yoga program! This also syncs to your current trimester.
Strength Exercises: Maintain Strength for Postpartum
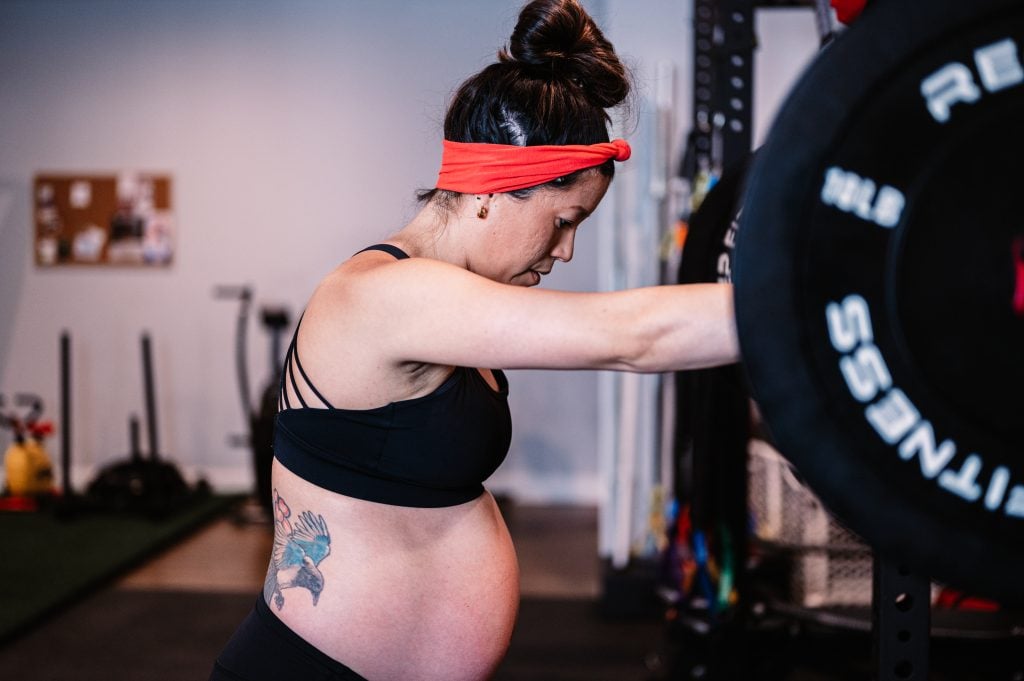
After my warm-up, I move on to strengthening exercises. In the final weeks of my pregnancy, my movements looked a bit different than earlier. I primarily use body weight, resistance bands, or free weights (dumbbells or kettlebells) instead of the barbell. This makes the setup much easier (and less time-consuming) –which is great since I feel more fatigued.
1) Hip Thrusts

Hip thrusts are an excellent glute-strengthening exercise—think of them as the bench press for your lower body. With three points of contact (your back and both feet) compared to the squat or deadlift (which only have two), hip thrusts provide enhanced stability during the movement.
In the final weeks of my pregnancy, I have opted to do unweighted hip thrusts with a mini band around my thighs. Earlier in this trimester, I also used a long resistance band across my hips, but the mini band and bodyweight are enough for me right now. I hope this shared experience can be helpful for you as well.
There are several variations for the end of your pregnancy that you can see in this modification breakdown video! We offer modifications for main lifts throughout your pregnancy in our prenatal strength program, so you can still lift safely throughout your pregnancy.
- 5 Workouts/Week
- Gym Workouts
- Self-Paced
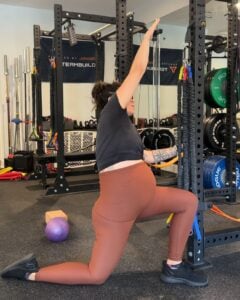
2) Squat to Leg Lift
In addition to the hip thrusts, I am including many squat variations to continue strengthening my legs in prep for birth. Ina Mae Gaskin, a well-known midwife in the birth world, claims if you do 300 squats a day, you’ll have a fast labor. I don’t know how true that is. I find that squats improve my lower body strength so I can maintain upright labor positions for longer in my labors, so I am including a ton now–but not quite 300 a day.


In this squat variation, I’m performing a supported squat to reach greater depth, followed by standing up and lifting one leg to help open the upper midpelvis (the area where the baby begins to rotate). This combination of movements can help make it easier for your baby to engage and start their rotation by creating more space in the inlet and upper midpelvis.
Strength + Pelvic Stability Exercises: Stay Comfortable in Pregnancy
In addition to the main lifts, I am also doing strengthening exercises that target pelvic stability. Pain is not a requirement of pregnancy–we have hundreds of clients who agree with this statement after doing our programs, too! Pelvic pain and other common prenatal discomforts can be resolved with movement (you don’t need to wait for birth for relief)!
The myofascial slings are networks of muscles, fascia, and ligaments that work together to help stabilize and move the body efficiently. Each sling has a unique function in providing stability, mobility, and power to different areas of the body. Here’s an overview of the four main slings:
- Anterior oblique sling
- Posterior Oblique Sling
- Lateral Sling
- Deep Longitudinal Sling
1. Anterior Oblique Sling
- Components: Includes the external obliques, internal obliques, and the contralateral (opposite side) adductors, connected by the anterior abdominal fascia.
- Function: This sling is essential for rotational movements and transferring load across the body. It supports activities that involve twisting, like swinging a bat or throwing. It also plays a crucial role in stabilizing the pelvis and spine during dynamic movements.
2. Posterior Oblique Sling
- Components: Composed of the latissimus dorsi, gluteus maximus, and thoracolumbar fascia.
- Function: The posterior oblique sling is key for stabilizing the lower back and pelvis during movements like walking, running, and lifting. It helps generate power through the back and hips and contributes to effective force transfer between the upper and lower body during activities like sprinting or climbing.
3. Lateral Sling
- Components: Includes the gluteus medius, gluteus minimus, tensor fascia latae (TFL), and the contralateral adductors.
- Function: The lateral sling is primarily responsible for stabilizing the pelvis during single-leg activities, such as walking, running, or balancing. It helps maintain proper alignment of the hips and lower body, preventing excessive side-to-side movement. This sling is crucial for balance and lateral stability during dynamic activities.
4. Deep Longitudinal Sling
- Components: Made up of the erector spinae, deep sacral ligaments, biceps femoris, and peroneus longus, connected by the thoracolumbar fascia.
- Function: The deep longitudinal sling supports the body during forward and backward movements. It provides stability to the spine and pelvis during activities such as walking and running by helping transfer force from the ground up through the legs and into the torso. This sling helps with maintaining posture and endurance during extended periods of standing or moving.
Each of these slings plays a vital role in distributing load, stabilizing the body, and creating coordinated movement, making them key to functional fitness and injury prevention. We incorporate these slings into every prenatal (and postnatal) workout to enhance pelvic stability and comfort throughout your pregnancy.
1) Lateral Step Up with Banded Row

The lateral step-up with a banded row is a posterior oblique strengthening exercise that stabilizes the SI joint (back pelvic joint). This exercise also includes hip rotation from a closed hip position (bottom of the step up with belly towards the thigh) and an open hip position (top of the step up with hips forward or belly away from the thigh). This hip rotation increases space in the middle of the pelvis and is a great way to incorporate internal hip rotation to open the lower half of the pelvis.
2) Split Squat with Row


The split-squat row is another posterior oblique sling strengthening exercise that stabilizes the SI joint and improves hip mobility from an open to closed hip position. At the bottom of the split squat, rotate your belly towards your thigh to find a closed hip (internal rotation) position. As you extend the hip, rotate the belly away from the forward thigh as you row the band backward.
Labor Prep/Relaxation Cool Down
The end of my workouts includes a labor prep cool down, where I practice different laboring positions and focus on relaxing from my workout. I usually choose a labor position with a birth ball since it provides a supportive position.
We include labor prep workouts in the third trimester of our prenatal fitness programs (both app-based and on-demand programs), where I guide you through a follow-along workout with various labor positions and comfort techniques. These workouts can be done with your partner or solo.
Seated Hip Circles

For this workout, I chose to do a seated hip circle movement to finish my workout. In the seated hip circles, I focus on progressive relaxation, where I start by relaxing in my face and moving down my body, bringing awareness and releasing tension. I use This relaxation technique in my labor, so I want to refresh on it before I go into labor for the fourth time!
My internal script for progression relaxation includes:
“Release between the eyes,
Release the jaw. Open and close.
Release down the neck into the shoulders.
Let them drop lower.
Releasing down the back into the hips.
Let them open.
Down through the legs, out through the feet.
Let this go.
Inhale, 1-2-3-4,
Exhale, 1-2-3-4.
Let this go.”
Conclusion
As I approach the final stages of my pregnancy, my prenatal and birth prep workouts continue to be an essential part of my routine. At 38 weeks, staying active has helped me maintain physical comfort and supported my body in preparing for labor. By incorporating a variety of movements that focus on opening the pelvis, stabilizing the core, and building strength, I can move through this stage with more confidence and ease. Each workout brings me closer to feeling ready for birth, both physically and mentally, ensuring that I’m well-prepared for the journey ahead.
Prenatal Support Courses


Learn the science of pregnancy and birth to take the mystery of labor away! Understand why you are feeling what you feel, and learn strategies to confidently move through pregnancy and birth!
- 9h+ of Video
- Support Group
- Close Captioning
- 5 Workouts/Week
- Gym Workouts
- Self-Paced
This course explore your pelvic floor anatomy, function, and how to prepare your pelvic floor for birth! This course includes educational videos, mobility exercises, relaxation drills, and how to relax your pelvic floor during labor tips.
- 2h+ of Video
- Mobility Flows
- Lifetime Access